Wine does real work in a traditional pot roast — it adds acidity, depth, and helps break down the connective tissue in the meat. This guide covers everything you need to replace it properly and build a roast that’s genuinely rich without it.
| 15 min | 3–4 hrs | 8 hrs | 6–8 |
| Active prep time | Oven cook time | Slow cooker option | Servings |
What wine actually does in a pot roast
Before you can replace wine properly, it helps to understand what it’s actually contributing. There are three things: acidity, flavour complexity, and liquid volume.
The acidity is the most important. Collagen-rich cuts like chuck roast need to cook in a mildly acidic environment to break down correctly. Without some acid in the braising liquid, the collagen takes much longer to convert to gelatin — and gelatin is what gives pot roast its characteristic silky, pull-apart texture and rich mouthfeel in the final braising liquid. Skip the acid entirely and the result is edible but noticeably less satisfying.
On collagen and braising: According to food science writing and research into meat cookery, collagen in beef connective tissue begins converting to gelatin at around 160°F (70°C), but it takes sustained heat over time to do this effectively. Acidic braising liquids accelerate this process — which is why wine, vinegar, or tomatoes appear in almost every traditional braise. This is the core reason wine matters in pot roast, and why its absence needs to be addressed with a different acidic ingredient.
The flavour complexity is real but easier to replace than the acidity. Wine brings tannins, fruity undertones, and depth. A properly built broth with aromatics, tomato paste, and good stock does much of the same work.
The liquid volume is the simplest part — just use more stock.
The best wine-free, paleo-friendly alternatives
These are the ingredients that replicate wine’s specific contributions in a paleo pot roast context. Most people use a combination rather than relying on just one.
Beef bone broth (the liquid base)
Good quality beef bone broth does double duty here — it adds liquid volume and brings natural gelatin to the braising liquid. The resulting gravy is richer than what you’d get with regular stock. Homemade is best, but a quality store-bought bone broth works well. Check labels if you’re strict paleo: some commercial broths contain additives that aren’t compliant.
Apple cider vinegar (the acidity)
One to two tablespoons of apple cider vinegar in the braising liquid provides the mild acidity that the meat needs. It doesn’t taste like vinegar in the finished dish — the long cook time mellows it completely. This is the single most important substitution for replicating what wine does structurally. Raw, unfiltered ACV with the mother is fine, but regular ACV works equally well here.
Tomato paste (depth and umami)
Two tablespoons of tomato paste cooked briefly in the pot before the liquid goes in adds significant depth. It also provides additional acidity. Tomatoes are a borderline paleo food — most practitioners include them, though strict elimination protocols sometimes exclude nightshades. If you’re doing a nightshade-free version, skip this and add an extra tablespoon of ACV.
Coconut aminos (subtle sweetness and umami)
A tablespoon of coconut aminos adds a background savoury note without soy or gluten. It’s subtle in a pot roast context — you won’t taste it distinctly — but it rounds out the braising liquid in a way that plain broth alone doesn’t quite achieve.
Mushrooms or mushroom powder (earthiness)
Dried mushrooms added to the braising liquid, or a teaspoon of dried mushroom powder, contribute the earthy depth that wine provides through its tannins. They also release glutamates that deepen the overall umami of the broth. Worth including if you have them — the flavour difference in the final dish is noticeable.
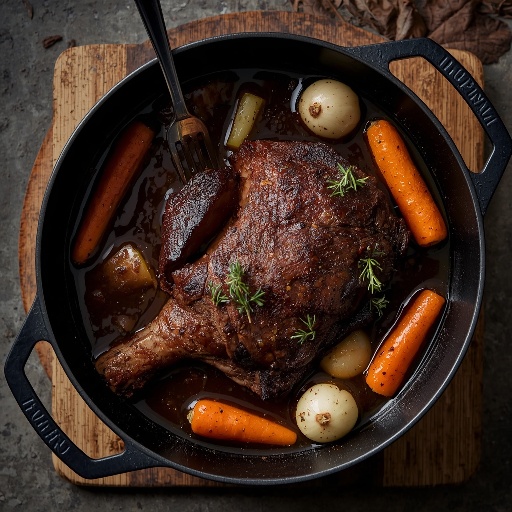
Choosing the right cut of beef
This matters more than most recipe variables combined. The wrong cut produces a dry, stringy result regardless of how good your braising liquid is. The right cut produces something that falls apart with a fork and stays moist even after reheating.
| Chuck roast | Brisket | Short ribs (bone-in) |
| Best choice | Excellent | Great option |
| Budget-friendly | Paleo ideal | |
| The definitive pot roast cut. Very high in collagen, gelatinises beautifully in a long braise. Widely available. Usually labelled chuck shoulder or blade roast. | Slightly more expensive but exceptional for braising. The flat cut is leaner; the point cut has more fat and more flavour. Either works — point cut is more forgiving. | Bone-in short ribs give the richest braising liquid of all. The bones add collagen. More expensive and the yield is lower, but the result is exceptional. |
| Round roast | Rump roast | Oxtail |
| (eye of round, top round) | Works well | Best broth |
| Not recommended | Paleo ideal | |
| Too lean for long braising. Low collagen content means it dries out and goes grainy. Better suited for roasting at higher temperatures, not low-and-slow braising. | Leaner than chuck but has enough connective tissue for a braise if cooked long enough. Needs an extra hour compared to chuck. Slightly firmer texture in the finished dish. | High collagen, extremely rich braising liquid, deeply flavourful meat. Takes 4+ hours. Not everyone has access to it, but if you do, it makes the best braised beef dish in this category. |
The full recipe
This recipe is built for a dutch oven or heavy oven-safe pot. Slow cooker instructions follow in the next section. The searing step at the beginning is the one thing that people sometimes skip — and they should not.
Ingredients
| 1.5–2kg chuck roast Brought to room temperature before cooking — at least 30 minutes out of the fridge. Cold meat in a hot pan doesn’t sear properly. | 500ml beef bone broth Good quality matters here. The broth is doing the work that wine usually does in terms of liquid base and gelatin contribution. | 1–2 tbsp apple cider vinegar Start with 1 tablespoon, taste the braising liquid after an hour and add more if it needs brightness. Raw or regular ACV both work. |
| 2 tbsp tomato paste Cooked briefly in the pot before liquid is added. This step — browning the paste — deepens the flavour considerably. | 1 tbsp coconut aminos Background depth and a very mild sweetness. Can be omitted if you don’t have it — the difference is subtle. | 1 large onion, quartered Don’t dice it small — large pieces hold together through the long cook and add body to the broth. |
| 6 garlic cloves, smashed Smashed rather than minced — they mellow and sweeten over the long braise without becoming sharp. | 3 medium carrots, roughly chopped Cut into large chunks — 4–5cm pieces. Small pieces dissolve into the broth. These should survive the cook with some texture. | 3 stalks celery, roughly chopped Adds aromatic depth. Wilts completely into the broth by the end, contributing flavour more than texture. |
| 2 medium parsnips or turnips, chunked Paleo-friendly root vegetable that adds bulk and mild sweetness. Parsnips sweeten more; turnips are slightly more neutral. | 2 sprigs fresh rosemary, 3 sprigs thyme, 2 bay leaves Tie together with kitchen twine if possible for easy removal. If not, fish out what you can before serving. | 2 tbsp fat for searing (beef tallow, ghee, or coconut oil) High smoke point fat for the searing step. Tallow is ideal for flavour; ghee is more accessible. Olive oil will smoke too aggressively at the temperature needed. |
| 1 tsp dried mushroom powder (optional) Adds the earthy depth component. Dried porcini powder is particularly good. A grocery store dried mushroom packet blended to powder works well. | Salt and black pepper, generously Season the meat aggressively before searing — this is not the moment for restraint. Under-seasoned meat going into a braise produces a flat-tasting result. |
Method — oven
- Preheat the oven to 160°C (320°F). Pat the chuck roast completely dry with kitchen paper. This step is not optional — surface moisture creates steam during searing, which prevents browning. Season very generously on all sides with salt and black pepper.
- Heat the tallow or ghee in a large dutch oven over high heat until just beginning to shimmer. Add the roast and do not move it for at least 3–4 minutes per side. You want a deep, dark brown crust — not grey. Turn and sear all sides, including the ends. Total searing time is usually 12–15 minutes. This step creates the Maillard reaction compounds that flavour the entire braise — it cannot be skipped or rushed.
- Remove the roast and set aside. Reduce the heat to medium. Add the onion and celery and cook for 3–4 minutes. Add the garlic and cook for one more minute. Add the tomato paste and stir constantly for 2 minutes — you’re cooking off the raw flavour and browning the paste slightly, which deepens the flavour considerably.
- Add the bone broth, apple cider vinegar, coconut aminos, and mushroom powder if using. Scrape the bottom of the pot with a wooden spoon — all those browned bits from the searing step are flavour, and they should all come up into the liquid. Add the herb bundle and bay leaves.
- Return the roast to the pot. The liquid should come about halfway up the sides of the meat — not cover it. Add the carrots, parsnips (or turnips), and celery around the sides of the roast. Bring to a gentle simmer on the stovetop.
- Cover with a tight-fitting lid and transfer to the oven. Cook for 3 to 4 hours. The roast is done when it yields easily to a fork — it should pull apart with almost no resistance. A large chuck roast needs the full 4 hours. Check at 3 hours: if the meat still resists when you press a fork into it, it needs more time.
- Remove the herb bundle and bay leaves. Transfer the roast to a cutting board or serving dish. Let it rest for 10 minutes before pulling or slicing. The braising liquid left in the pot is the gravy — spoon off excess fat if needed, then serve as-is or reduce slightly on the stovetop for a more concentrated sauce.
Oven method vs slow cooker
Both methods work. They produce slightly different results and suit different schedules.
| Dutch oven (oven) | Slow cooker (low) | Slow cooker (high) | Instant Pot / pressure cooker |
| 3–4 hours at 160°C | 8–10 hours | 4–5 hours | 60–75 minutes |
| Better browning on the meat during the covered cooking stage. Slightly richer braising liquid. Requires you to be home and able to check it. Better for weekends. | Hands-off after setup. Good for work days — start it in the morning, done by dinner. Still requires searing in a separate pan first. The liquid may be thinner — reduce it on the stovetop if needed. | Works but lower setting produces a better texture. High heat can push the braise past tender into dry and stringy if you’re not watching the time carefully. | Fastest option. Uses the sauté function for searing, then pressure-cook on high. The result is tender but the texture is slightly different — less of the gradual collagen conversion that low-and-slow produces. |
Important for slow cooker users: Do not skip the searing step even when using a slow cooker. The Maillard reaction that happens when the meat browns in a hot pan produces flavour compounds that cannot be replicated by any amount of extra cooking time at low temperature. Sear in a separate pan, then transfer everything to the slow cooker. It adds ten minutes to your morning but makes a genuine difference in the finished dish.
Which vegetables work on paleo
Pot roast vegetables is one of the areas where paleo cooking diverges from a standard recipe. White potatoes are excluded from strict paleo — but there are several good alternatives that braise beautifully.
| Parsnips | Turnips | Celeriac | Sweet potato |
| Sweet, tender, holds shape. Best paleo potato substitute in a braise context. | More neutral, slightly peppery. Good if you want less sweetness than parsnip. | Earthy, creamy when braised. Excellent in pot roast — underused and worth seeking out. | Paleo-compliant. Add in the last 90 minutes only — it overcooks and disintegrates if left for the full braise. |
| Carrots | Mushrooms | Beetroot | White potato |
| Standard and reliable. Cut into large chunks so they survive the full cooking time. | Add depth and umami to the broth. Add whole cremini or portobello mushrooms in the last 2 hours. | Less common but works well. Will stain the braising liquid a deep ruby colour. Strong earthy flavour. | Excluded from strict paleo. Use parsnip or turnip instead. Some modern paleo practitioners do include white potato — depends on your framework. |
Getting the broth thick without flour or cornstarch
Traditional pot roast gravies are often thickened with flour or cornstarch — neither of which is paleo. The good news is that a properly made paleo pot roast doesn’t really need them if a few things are done right.
Use bone broth, not regular stock
Bone broth contains significantly more natural gelatin than regular stock. As the braise cooks, this gelatin contributes to the body of the liquid. A broth made from a good bone broth will set to a loose jelly when refrigerated — that’s how you know it has enough gelatin to create a thick, silky sauce without any thickener.
Reduce the braising liquid on the stovetop
After removing the meat, simmer the braising liquid uncovered over medium-high heat for 10–15 minutes. It reduces and concentrates. You’ll see it visibly thicken as the water evaporates and the gelatin concentration increases. This is the most reliable paleo-friendly thickening method.
Arrowroot starch (if you need it thicker)
If the reduced liquid still isn’t thick enough, arrowroot starch is paleo-compliant and works like cornstarch. Mix 1 tablespoon with 2 tablespoons of cold water, stir into the simmering broth, and cook for 60–90 seconds until it thickens. It loses its thickening power if boiled for too long, so add it toward the end.
Make-ahead, storage, and reheating
Pot roast is one of those rare dishes that’s genuinely better the next day. The braising liquid continues to develop overnight, the meat relaxes further, and the fat solidifies on the surface of the refrigerated broth — which you can then lift off cleanly if you want a leaner result.
Store in an airtight container in the fridge for up to 4 days. Reheat gently over medium-low heat with a splash of broth or water to loosen the liquid. Don’t microwave it at high heat — it drives off the remaining moisture and the meat starts to dry out.
Freezes very well. Pull the meat apart into large pieces and freeze submerged in the braising liquid. Thaw overnight in the fridge and reheat gently. The texture holds up better than most braised meats when frozen, thanks to the high collagen content of chuck roast.
Common mistakes
Not searing the meat properly
Pale, grey searing is not searing — it’s steaming. The pan must be very hot before the meat goes in, the meat must be completely dry, and it needs to stay in contact with the pan surface without moving for several minutes. If it releases easily when you try to lift it, it’s ready to turn. If it sticks, it needs more time.
Skipping the acid
This is the most common mistake in wine-free pot roast. The apple cider vinegar isn’t just for flavour — it’s doing structural work by helping break down the collagen. A pot roast braised in plain stock without any acid takes significantly longer to become tender and the texture is coarser. Don’t skip it or reduce it thinking it’ll taste too vinegary. It won’t. The long cook mellows it entirely.
Using too much liquid
The liquid should come halfway up the meat at most. This is a braise, not a soup. Too much liquid dilutes the concentration of flavour in the final broth and prevents the meat from developing the layered texture that makes pot roast different from boiled beef.
Opening the lid repeatedly
Every time the lid comes off, heat escapes and the temperature inside the pot drops. In a long braise, this extends the cook time and disrupts the gradual, sustained heat that collagen-to-gelatin conversion requires. Check at the halfway mark and at the end. That’s it.
Pulling it before it’s genuinely ready
There’s a stage around 2.5 to 3 hours where chuck roast is cooked through but not yet tender — it’s actually tougher than when it went in. This is the collagen contracting before it converts to gelatin. Most people make the mistake of thinking it’s done or giving up here. Keep going. Another 45 minutes to an hour and everything changes: it goes from chewy and firm to falling apart.
See Also – Egg-Free Banana Bread That’s Actually Moist
See Also – Nut-Free Granola Recipe Without Honey