School-safe, allergy-friendly, and genuinely crunchy — here’s how to make granola that doesn’t compromise on anything.
Why This Combination Is Harder to Find Than It Should Be
Most granola recipes fall into one of two camps. Either they’re loaded with almonds, cashews, or pecans (great for flavor and crunch, useless for anyone with a nut allergy), or they use honey as the primary binder and sweetener (off the table for vegans, people with bee allergies, and children under one year old).
Finding a recipe that skips both is genuinely tricky. Not because the combination is technically difficult — it isn’t — but because most recipe developers aren’t working around both constraints simultaneously.
According to Food Allergy Research & Education (FARE), tree nuts are among the top nine food allergens in the United States, affecting millions of people across all age groups. For school-age children especially, nut-free food isn’t a preference — it’s a necessity. And when honey is also off the table, the recipe pool shrinks fast.
This article gives you a solid, tested recipe for nut-free granola made without honey, along with the reasoning behind each ingredient choice, so you can adapt it confidently when needed.
What You Lose Without Nuts and Honey (And What Replaces It)
It’s worth being honest about what nuts and honey actually do in granola before explaining what replaces them. Otherwise, substitutions feel arbitrary.
What Nuts Contribute
Nuts serve three functions in granola: they add crunch that survives the baking process without becoming hard, they contribute fat that helps everything toast evenly, and they provide protein and caloric density that makes granola satisfying rather than just sweet.
Without nuts, granola can become either uniformly soft (from too many oats with nothing to break up the texture) or brittle and sparse-feeling. The fix involves using seeds and other mix-ins that replicate some of these functions.
What Honey Contributes
Honey is a particularly effective granola binder because of its viscosity and its chemical behavior when heated. It coats ingredients evenly, promotes clustering and clumping as the granola bakes and cools, and caramelizes slightly in the oven to add a distinctive golden sweetness.
Replacing honey isn’t just about finding another sweetener — it’s about finding one that also clusters the granola properly. Not all liquid sweeteners behave the same way. Maple syrup, brown rice syrup, agave, and date syrup each have different viscosities, caramelization points, and flavor profiles.
The Best Honey Substitutes for Granola (Tested)
Maple Syrup
This is the most reliable direct substitute and the one used in this recipe. Pure maple syrup has a similar viscosity to honey, caramelizes well in the oven, and produces granola that clusters decently — not quite as aggressively as honey, but close enough that you won’t notice if you’ve never made the comparison side by side.
The flavor is distinct — less floral than honey, more woody and sweet — and works beautifully with oats, seeds, cinnamon, and vanilla.
One practical note: use pure maple syrup, not pancake syrup. Pancake syrup is mostly corn syrup with maple flavoring and behaves differently in baking.
Brown Rice Syrup
This is the clumping champion among honey substitutes. Brown rice syrup is considerably thicker and stickier than maple syrup, which means granola made with it forms large, satisfying clusters. The flavor is very mild — almost neutral — which is useful if you want the spice or flavoring to take center stage.
The downside: it’s harder to find in regular grocery stores (natural foods stores usually carry it) and more expensive. But for anyone who has been disappointed by loose, cluster-free granola, it’s worth the effort at least once.
Agave Syrup
Agave is lighter in flavor than honey and thinner in consistency than maple syrup. It works in granola but produces a less crispy result and doesn’t cluster as well. It’s a usable substitute, but not the first choice for texture.
Date Syrup
Made from blended dates, this has a rich, caramel-like sweetness that pairs particularly well with warming spices. It’s thicker than maple syrup and produces good results. Worth trying if you already have it on hand or have a date-forward flavor in mind for the batch.
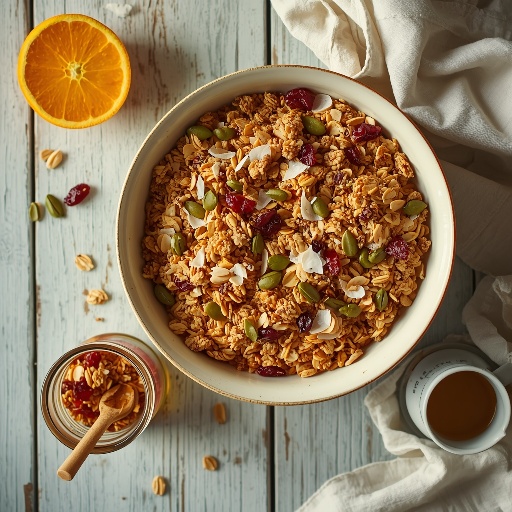
The Recipe: Nut-Free Granola Without Honey
Ingredients (Makes about 5 cups)
The oat base:
- 3 cups old-fashioned rolled oats (not instant)
- ½ cup pumpkin seeds (pepitas)
- ½ cup sunflower seeds
- ¼ cup sesame seeds
- ¼ cup hemp seeds (optional — adds protein and a subtle nuttiness)
The fat and sweetener:
- ¼ cup coconut oil, melted (or a neutral oil like avocado oil)
- ⅓ cup pure maple syrup
- 2 tablespoons brown sugar (packed)
- 1½ teaspoons pure vanilla extract
The spice blend:
- 1 teaspoon ground cinnamon
- ¼ teaspoon ground nutmeg
- ¼ teaspoon fine salt
Optional mix-ins (added after baking):
- ½ cup dried cranberries, raisins, or chopped dried apricots
- ¼ cup shredded unsweetened coconut (toasted separately if preferred)
- ¼ cup sunflower butter chips or dairy-free chocolate chips
A Note on Oats and Cross-Contamination
For anyone making this recipe due to a severe nut allergy, oat sourcing matters. Regular oats are often processed in facilities that also handle tree nuts, and cross-contamination is a genuine concern. Look for oats labeled “certified nut-free” or “processed in a nut-free facility” — these are available from several brands and increasingly easy to find. If the allergy is severe, this step isn’t optional.
Step-by-Step Instructions
Step 1: Preheat and Prepare
Preheat your oven to 325°F (165°C). Line a large rimmed baking sheet with parchment paper. The lower temperature is deliberate — granola burns quickly at higher heat, and 325°F gives you more control, especially without the extra fat that nuts would contribute.
Use the largest baking sheet you own. Spreading the granola in a thin, even layer is what produces even toasting. Crowding it leads to steaming rather than crisping, and you end up with soft, chewy granola instead of crunchy.
Step 2: Mix the Dry Ingredients
In a large bowl, combine the rolled oats, pumpkin seeds, sunflower seeds, sesame seeds, and hemp seeds (if using). Add the cinnamon, nutmeg, and salt. Stir until everything is evenly combined.
At this point, the mixture will look quite plain and it’s hard to imagine it turning into something you’d want to eat. Trust the process. The transformation happens in the oven.
Step 3: Combine the Wet Ingredients
In a small saucepan or microwave-safe bowl, combine the melted coconut oil, maple syrup, and brown sugar. If using a saucepan, warm over low heat until the sugar dissolves — just a minute or two. Remove from heat and stir in the vanilla extract.
The brown sugar is worth including even though the maple syrup already provides sweetness. Brown sugar caramelizes differently than liquid sweeteners and contributes to that golden, slightly sticky finish that makes granola feel properly done.
Step 4: Coat the Oat Mixture
Pour the wet mixture over the dry ingredients. Use a large spoon or rubber spatula to stir and fold until every oat and seed is coated. Take your time with this step — uneven coating means uneven toasting and inconsistent flavor in the finished batch.
The mixture should look glossy and slightly wet, not soupy. If it looks very dry, add a small additional drizzle of maple syrup. If it looks very wet, that’s fine — it dries out in the oven.
Step 5: Spread and Bake
Spread the mixture onto the prepared baking sheet in an even layer. Press it down firmly with the back of a spatula or your hands. This pressing step is key for cluster formation — the more compact the layer, the more the granola will stick together as it bakes and cools.
Bake for 20 minutes. Then remove from the oven, and without stirring, rotate the pan 180 degrees and return to the oven for another 10 to 15 minutes. The no-stirring approach preserves the clusters. If you stir mid-bake, you break up the structure before it’s had a chance to set.
Watch it carefully in the last 5 minutes. Granola goes from golden to burned faster than you’d expect, and seeds have a lower fat content than nuts, which means they can scorch quickly.
Step 6: Cool Completely Before Breaking Apart
Remove the pan from the oven when the granola is a deep golden color and smells toasty and caramelized. It will still feel soft at this point — that’s normal. Granola crisps up as it cools, not while it’s hot.
Let the pan sit undisturbed at room temperature for at least 30 minutes, ideally 45. Once completely cool, break it into clusters by hand or with a spatula. The longer you wait, the more the clusters will hold together.
Step 7: Add the Mix-Ins
Once fully cooled, stir in dried fruit, coconut, or chocolate chips if using. Adding these before baking would either burn them or make them tough and chewy. Adding them after preserves their texture and keeps the flavor clean.
Getting the Clusters Right: The Real Challenge
Cluster formation is the thing people struggle with most when making granola without honey and nuts. Here’s what actually determines whether you get clusters or just loose toasted oats.
The Pressing Matters More Than the Recipe
No recipe produces good clusters if you skip the pressing step. Before it goes in the oven, press the granola down firmly into a compact layer. After it comes out, leave it alone. Those two things are more responsible for cluster formation than any specific ingredient ratio.
Fat Ratio
More fat means more cohesion. If your granola isn’t clustering well, try increasing the oil by one tablespoon in the next batch. This is especially relevant when skipping nuts, since nuts would have contributed their own fat content to the mix.
Brown Rice Syrup as a Cluster Booster
If clusters are really important to you — if loose granola bothers you enough that you’d change the recipe — swap the maple syrup for brown rice syrup. The difference in cluster formation is significant. The trade-off is a milder, less complex flavor and slightly stickier texture in finished clusters.
Letting It Cool in the Pan
Moving the granola to a cooling rack while it’s still warm breaks up the clusters before they’ve had a chance to bond properly. Leave it on the baking sheet until it’s fully at room temperature.
Flavor Variations to Keep It Interesting
This base recipe is intentionally neutral enough to adapt in a lot of directions. Once you’ve made it once and understand how it behaves, these variations are easy to execute.
Tropical Version
Swap cinnamon for cardamom (same amount). Add ¼ cup unsweetened shredded coconut to the dry mix before baking. After baking, mix in dried mango pieces, dried pineapple, and a small handful of toasted coconut flakes. The cardamom-coconut-tropical fruit combination is distinctive and works particularly well with plain coconut yogurt.
Chocolate Seed Granola
Add 2 tablespoons of unsweetened cocoa powder to the dry mix before combining with wet ingredients. Increase the maple syrup by one tablespoon to compensate for the bitterness of the cocoa. After baking and cooling, add dairy-free chocolate chips or cacao nibs. Skip the cinnamon or reduce it to ½ teaspoon so it doesn’t compete.
Citrus and Ginger
Add 1 teaspoon of ground ginger and the finely grated zest of one orange to the dry mix. The ginger adds warmth and a slight sharpness, and the orange zest brightens everything. After baking, add dried cranberries or golden raisins.
Savory Granola
This is less common but worth knowing about. Reduce the maple syrup by half and eliminate the vanilla and sugar. Add 1 tablespoon of soy sauce or tamari to the wet mix, along with a teaspoon of smoked paprika and ½ teaspoon of garlic powder. The result is a savory, crunchy mix that works on salads, soups, or as a snack with hummus.
What to Serve It With
Yogurt Parfaits
The most common use, and for good reason. Layer granola with plain or vanilla yogurt (dairy or plant-based) and fresh or frozen berries. For a nut-free, honey-free version, sweeten the yogurt with a small drizzle of maple syrup rather than honey. The granola adds crunch that holds up for a few minutes before softening into the yogurt.
Smoothie Bowls
A thick smoothie topped with granola, sliced banana, and seeds makes a filling breakfast that’s quick to assemble if you already have the granola made. The granola softens quickly in contact with a wet smoothie, so add it right before eating.
As a Straight Snack
With a bit of dried fruit mixed in, this granola is completely snackable on its own. Portioning it into small containers or zip-lock bags makes it a practical lunchbox addition for children — it’s nut-free, doesn’t need refrigeration, and holds up in a bag without crumbling to dust.
On Oatmeal
A small handful of crunchy granola on top of a bowl of hot oatmeal adds texture contrast and makes a fairly plain breakfast feel more interesting. Seeds and dried fruit in the granola complement the oatmeal without duplicating it.
Storage: How Long It Actually Lasts
At Room Temperature
Store in an airtight container at room temperature for up to three weeks. A glass jar with a tight lid works well. Avoid plastic bags for long-term storage — they let in enough air to make the granola go soft within a week.
The keys to keeping granola crispy are keeping moisture out (airtight container) and keeping it away from heat (don’t store near the stove or in a cabinet that gets warm from the oven below it).
Freezing
Granola freezes well for up to three months. Portion it into a freezer bag, press out the air, and seal. Take out what you need and let it come to room temperature for a few minutes before eating — it returns to full crispness quickly. This is particularly useful if you make large batches on the weekend.
Who This Recipe Is For (And Why It Matters)
This isn’t just a recipe for people with tree nut allergies, though it’s certainly safe for them. It’s also the right recipe for:
School lunchbox packing — many schools have strict nut-free policies, and sending granola bars or cereal that contains nuts isn’t an option. Homemade nut-free granola that’s also clearly labeled (you know every ingredient) is a practical solution.
Vegans — honey is an animal product that many vegans avoid. Maple syrup is a straightforward substitute that doesn’t require explaining or justifying at a shared meal.
Infants transitioning to solid foods — honey is not recommended for children under one year due to the risk of infant botulism. The CDC’s guidance on infant feeding is clear on this point: honey in any form — including baked into granola — should not be given to children under 12 months. A maple syrup version removes this concern entirely.
Anyone who simply ran out of honey — this happens. And the maple syrup version is good enough that you might not go back.
The Nutritional Picture
Per half-cup serving (approximate, without mix-ins), this granola provides a reasonable balance of carbohydrates, fat, and protein, primarily from the oats and seeds. Pumpkin seeds and hemp seeds are particularly nutrient-dense additions — pumpkin seeds are one of the better plant-based sources of zinc and magnesium, while hemp seeds contain a favorable ratio of omega-3 to omega-6 fatty acids.
Harvard T.H. Chan School of Public Health’s Nutrition Source has documented the well-established cardiovascular and metabolic benefits of oats, including their soluble fiber content (beta-glucan) and effects on cholesterol levels. Granola built on a rolled oat base retains most of these benefits, though the added sugar and oil mean it’s best treated as a component of a meal rather than a stand-alone food eaten in large quantities.
A half-cup serving is a reasonable portion. Many people find granola easy to overeat directly from the container — worth being aware of if portion control is relevant for you.
Summary: Simple Ingredients, No Compromises
The nut-free, honey-free granola in this article isn’t a second-best version of something better. It’s a complete recipe built around what seeds and maple syrup actually do — not a wheat-flour cake recipe with eggs swapped out and crossed fingers.
Make it once, get a feel for how your oven handles it and whether you prefer more or less sweetness, and adjust from there. It’s the kind of thing you’ll start making in double batches once you realize how quickly it disappears.
See Also – Leftover Ham Bone Soup Recipe: Slow Cooker Method (The One Worth Making)
See Also – What to Do with Leftover Roast Chicken Besides Soup