Some recipes carry history in every layer. Appalachian stack cake is one of them.
This is not a cake you make because it’s quick or because you happened to have the ingredients. You make it because it’s something older and more particular than most things baked in a modern kitchen — a cake that takes patience, planning, and a little understanding of where it came from and why it’s made the way it is.
The result, when done properly, is extraordinary. Thin gingerbread-like layers pressed together with a deeply spiced dried apple filling that softens the whole structure over two days in the refrigerator. A cake that is, by almost any standard, better the day after it’s made than the day it’s assembled.
The History Behind the Cake
Appalachian stack cake has roots deep in the mountain communities of Kentucky, Tennessee, Virginia, West Virginia, and the surrounding region — places where sugar and refined ingredients were expensive and community gatherings required a different kind of ingenuity.
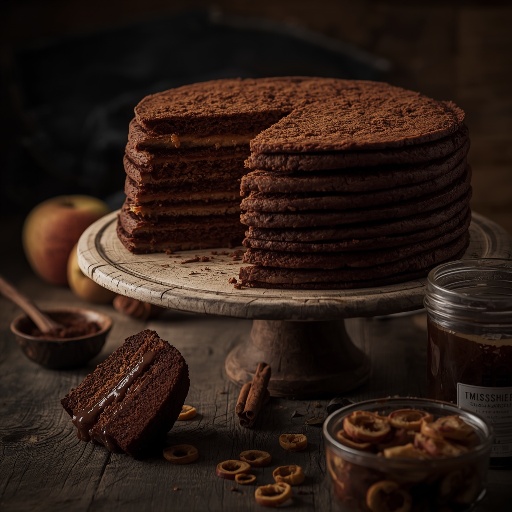
The most often-told story is that it was a wedding cake. Each family or neighbor attending the celebration would bring a single layer — thin, gingerbread-like rounds baked from a molasses dough — and the layers would be stacked at the celebration with the dried apple filling between each one. The taller the stack, the more popular the bride. A six-layer cake was modest; an eight or ten-layer cake meant the family was well-regarded in the community.
Dried apples were the filling because fresh apples were perishable and sugar was scarce. Drying apples concentrated their flavor and preserved them through winter. When rehydrated with spices, the result was a thick, deeply aromatic filling that softened the firm cake layers over hours of resting.
The cake was never meant to be eaten immediately. The resting period — sometimes called “curing” — is what makes it. Fresh-assembled, the layers are firm and the filling is distinct. After twenty-four to forty-eight hours in the refrigerator, the moisture from the filling migrates into the cake, the layers soften and fuse, and the whole thing becomes a unified, dense, deeply flavored creation unlike anything else in American baking.
This is not a recipe that’s been modernized for speed or convenience. This is the old way, the right way, and it’s worth doing.
What Makes This Recipe Authentic
The word “authentic” gets used loosely in recipe writing. In this context it means specific things.
Dried apple filling, not fresh. Fresh apple filling can work in a pinch, but dried apples, rehydrated and cooked down with spices and sorghum or brown sugar, produce a different texture and flavor entirely. The concentrated, slightly tart, deeply spiced filling is what makes the cake. Dried apples are available in most grocery stores and easily made at home.
Sorghum molasses in the cake layers. Traditional Appalachian stack cake uses sorghum syrup, which is darker and slightly more mineral-tasting than conventional molasses. If you can find it, use it. If not, unsulfured blackstrap molasses is the closest substitute and perfectly acceptable.
Thin layers. Authentic stack cake layers are thin — typically about a quarter inch once baked. Not a sponge cake layer. Not a thick biscuit. Somewhere between a very thin gingerbread and a firm, spiced cookie. They’re rolled and baked, not poured.
The resting period. Non-negotiable. Assemble the cake at minimum twenty-four hours before serving. Forty-eight is better. This is built into the recipe, not an optional patience exercise.
Ingredients
For the Cake Layers (Makes 6–8 layers)
- 5 cups all-purpose flour, plus more for rolling
- 1 teaspoon baking soda
- 1 teaspoon baking powder
- 1½ teaspoons ground ginger
- 1 teaspoon cinnamon
- ½ teaspoon allspice
- ½ teaspoon salt
- ½ cup (1 stick) unsalted butter, softened
- 1 cup granulated sugar
- ¾ cup sorghum molasses (or unsulfured blackstrap molasses)
- 2 large eggs
- ⅓ cup whole buttermilk
For the Dried Apple Filling
- 1 lb (about 3–4 cups) dried apples
- 4 cups water (plus more as needed)
- 1 cup granulated sugar (or adjust to taste — dried apples vary in sweetness)
- 1 teaspoon cinnamon
- ½ teaspoon allspice
- ¼ teaspoon nutmeg
- ¼ teaspoon ground cloves
- Pinch of salt
Optional: 2 tablespoons sorghum molasses added to the filling for depth
Making the Dried Apple Filling
Start the filling first. It needs time to cook down properly, and it also needs to cool before you use it — spreading warm filling on the cake layers can make them steam and lose their structure.
Step 1: Soak the apples. Place the dried apples in a large pot and cover with four cups of water. Let them soak for at least thirty minutes, longer if the apples are very dry and leathery. They’ll absorb a significant amount of water and begin to soften.
Step 2: Cook down. Bring the pot to a boil over medium-high heat, then reduce to a simmer. Cook uncovered for thirty to forty minutes, stirring occasionally, until the apples are completely tender and beginning to break down. Add more water if the pot looks dry before the apples have softened — they should cook in enough liquid to prevent scorching.
Step 3: Add sugar and spices. Once the apples are soft, add the sugar, cinnamon, allspice, nutmeg, cloves, and salt. Stir well and continue cooking for another ten to fifteen minutes until the mixture has thickened to a jam-like consistency. It should hold its shape on a spoon rather than flowing freely.
Step 4: Mash or blend (partly). Some people prefer a completely smooth filling; others like a slightly chunky texture with recognizable pieces of apple. Traditional versions are somewhere in between — roughly mashed with a fork or potato masher rather than blended smooth.
If the filling is still very loose after mashing, return it to medium heat and cook a few minutes more. It will thicken further as it cools.
Step 5: Cool completely. Remove from heat and let cool to room temperature, then refrigerate until fully cold. This can be made two to three days ahead, which is helpful given the overall timeline of the cake.
Making the Cake Layers
The dough for stack cake layers is firm and workable — closer to a cookie dough than a cake batter. Don’t expect to pour or spoon it.
Step 1: Combine dry ingredients. In a large bowl, whisk together the flour, baking soda, baking powder, ginger, cinnamon, allspice, and salt. Set aside.
Step 2: Cream butter and sugar. In a stand mixer or with a hand mixer, beat the softened butter and sugar on medium speed for two to three minutes until lightened and fluffy. Add the eggs one at a time, beating well after each. Add the molasses and beat until combined — the mixture will look slightly curdled at this stage. That’s normal.
Step 3: Add flour mixture. Add the flour mixture in three additions, alternating with the buttermilk (flour, half the buttermilk, flour, remaining buttermilk, flour). Mix until just combined after each addition. The dough will be stiff and slightly sticky.
Turn the dough out onto a lightly floured surface and knead gently a few times until smooth. Divide into six to eight equal portions. The number of layers is a personal choice — six makes a taller cake with thicker layers; eight makes a more traditional, thinner-layered result. Eight is the more authentic choice if you have the patience for it.
Wrap the portions in plastic wrap and refrigerate for at least one hour. This firms the dough and makes it easier to roll without tearing.
Step 4: Roll and bake. Preheat the oven to 350°F (175°C). Line baking sheets with parchment paper. Lightly flour your work surface.
Take one portion of dough from the refrigerator and roll it into a circle approximately the size of your serving plate — typically nine to ten inches in diameter. The layer should be about a quarter inch thick. If the edges crack when rolling, let the dough warm for a few minutes before trying again.
Carefully transfer the rolled dough circle to the prepared baking sheet. Use the bottom of a nine-inch round cake pan or a dinner plate as a guide and trim any irregular edges with a sharp knife or pizza cutter. Keep the trimmings — they can be re-rolled for an extra partial layer or baked separately as a cook’s snack.
Bake for ten to twelve minutes until the layer is set and just barely beginning to darken at the edges. Don’t overbake — these layers firm up considerably as they cool and will become too hard if baked until they look done on top.
Transfer to a wire rack and repeat with each remaining portion of dough, working in batches if needed. The layers can be baked and stored at room temperature for up to two days before assembling.
Assembling the Cake
This is the most straightforward part of the whole process, and also the most satisfying.
Step 1: Choose your plate or stand carefully. This cake is heavy once assembled. Choose a plate or cake stand that’s larger than the cake diameter so you have room to work, and one sturdy enough to go into the refrigerator for two days.
Step 2: Place the first layer. Set the first cake layer on the plate. Spread a generous, even layer of cold dried apple filling over the surface — about a third to half a cup per layer depending on the size and number of your layers. Spread to about half an inch from the edge; the filling will spread naturally under the weight of subsequent layers.
Step 3: Continue stacking. Place the next layer directly on top of the filling, pressing down gently and evenly. Repeat with filling and layers until all layers are used. End with a plain cake layer on top — no filling on the very top.
Step 4: Wrap and refrigerate. Wrap the entire assembled cake loosely in plastic wrap, then cover the plate tightly with another layer. Refrigerate for a minimum of twenty-four hours. Forty-eight is genuinely better. The layers will soften, the cake will settle and compress slightly, and the flavors will meld into something that couldn’t exist any other way.
Step 5: Serve. Remove from the refrigerator about thirty minutes before serving. The cake cuts cleanly with a sharp serrated knife. Dust with powdered sugar just before serving if you want a finishing touch — traditionalists often don’t bother.
Serve in thin slices. This is a dense, rich cake and a small piece is more satisfying than a large one.
Variations and Regional Differences
Not every version of this cake is identical. The recipe above represents a fairly traditional central Appalachian interpretation, but variations exist across the region and between families.
Spice variations: Some recipes include cardamom, mace, or a larger amount of ginger in the cake layers. Some add a small amount of black pepper, which adds a subtle warmth that works well with the molasses.
Filling variations: Some versions use fresh-cooked apple butter instead of dried apple filling. Apple butter produces a thinner, smoother filling that soaks into the layers more quickly — a one-day rest is often sufficient with apple butter. Dried apple filling is more traditional and produces a more textured result.
Number of layers: Traditional accounts mention cakes with as few as five and as many as twelve layers. For a home baker, six to eight is practical. More than eight requires multiple baking days and a very steady hand during assembly.
Sweetness level: Older recipes are noticeably less sweet than modern versions. The sweetness in authentic stack cake comes largely from the dried apple filling rather than the cake layers themselves. If the recipe above seems sweet enough to your taste, reduce the sugar in the filling by a quarter cup — older recipes often would have used much less.
Common Mistakes and How to Avoid Them
Overbaking the layers. This is the most common error. The layers look pale when done and will seem underbaked. They firm up significantly as they cool. Ten to twelve minutes at 350°F is enough. Test with a light press — the layer should spring back gently.
Not cooling the filling completely. Warm filling on cake layers creates steam, softens them unevenly before the resting period, and can cause the whole assembly to become unstable. Make the filling a day ahead and refrigerate it.
Skipping the resting period. Freshly assembled stack cake is not good. The layers are firm, the filling is distinct, and the flavors haven’t merged. If you serve it immediately, you’ll wonder what the fuss is about. Give it time.
Rolling uneven layers. Uneven thickness means uneven baking — the thin parts get too firm, the thick parts stay soft. Roll methodically from the center outward, rotating the dough regularly. A quarter-inch thickness is the target throughout.
Using fresh apples instead of dried. Fresh cooked apples produce a much wetter filling. If you use them, cook them down significantly longer and reduce the added liquid to a minimum. The result is different — not bad, but not traditional.
Storage
Assembled and refrigerated, stack cake keeps remarkably well. The acidity of the dried apple filling acts as a mild preservative.
Refrigerator: Up to one week, wrapped tightly. The flavor continues to develop and the texture improves for the first two to three days, then stabilizes.
Freezer: Individual slices wrapped in plastic and foil can be frozen for up to two months. Thaw overnight in the refrigerator. The texture is slightly different after freezing — still good, just more compressed — but the flavor holds.
The whole assembled cake can also be frozen before the resting period, thawed in the refrigerator for twenty-four hours, and then rested another twenty-four hours for the full effect. This works well for making ahead of the holidays.
Why This Cake Still Matters
There’s a reason Appalachian stack cake keeps appearing in food writing, at heritage festivals, and in the kitchens of people who have never set foot in eastern Kentucky. It’s not nostalgia exactly — or not only that.
It’s a cake that requires you to slow down. To make the filling ahead. To roll eight thin layers. To wait two days. Those aren’t obstacles; they’re the whole point. The structure of the recipe teaches you something about how food used to be made and why it was worth making that way.
When you finally cut into a properly rested stack cake — the layers fused together, the filling fragrant with cinnamon and allspice, the whole thing dense and yielding — it tastes like something that took care. Because it did.
That’s what old-fashioned means here. Not inferior to modern recipes. Better.
See Also – Southern smothered pork chops with gravy — Puerto Rico style
See Also – Griddle breakfast recipes for camping in Michigan