A complete guide to braising chicken thighs entirely on the stovetop in a dutch oven — with a California-influenced approach that leans on citrus, fresh herbs, garlic, and the season’s best produce. No oven required. No compromises needed.
| 10 min | 45 min | 4–6 | 1 pot |
| Prep time | Total cook time | Servings | Everything in it |
Why the stovetop works just as well as the oven
Most braised chicken recipes end with a trip into the oven, and there’s a reason for that — the oven surrounds the pot with consistent heat from all sides, which produces even cooking without the need to monitor the flame. But it’s not the only way, and in a lot of situations — apartments without reliable ovens, hot California summers when turning on the oven is genuinely not appealing, small kitchens where the oven is already doing something else — the stovetop is a better choice.
A dutch oven on a low stovetop flame behaves almost identically to a dutch oven in a moderate oven, provided the heat is kept low and steady and the lid is kept on. The thick walls and heavy base of a cast iron dutch oven distribute heat evenly enough that it’s difficult to create the hot spots that cause uneven cooking in thinner pans.
On dutch ovens specifically: A dutch oven is a thick-walled, heavy cooking pot with a tight-fitting lid. The design creates a self-basting environment — steam from the liquid condenses on the lid and drips back down over the food, keeping the meat moist throughout a long cook. According to culinary reference materials, dutch ovens have been used for braising since at least the early 18th century, and the principle hasn’t changed. The stovetop version simply uses the burner’s heat source instead of the oven’s ambient heat — the result inside the pot is essentially the same.
The one thing you do need to watch on the stovetop is the flame. Medium-low is usually right. You want the liquid barely simmering — not boiling hard, not stone cold. Too high and the chicken toughens; too low and the collagen doesn’t convert properly. Once you’ve found the right setting on your particular burner, check the pot once every ten minutes or so and adjust if needed.
What makes this California-style
“California cuisine” is a real culinary tradition, not just a vague geographic label. It developed in the late 1970s around the idea of using fresh, locally sourced, seasonal ingredients — particularly citrus, stone fruits, herbs, and the exceptional produce from California’s Central Valley and coastal farms — as the primary flavour drivers rather than heavy sauces or complex technique.
For a stovetop chicken braise, this means: lemon instead of white wine for acidity. Fresh garlic and shallots instead of dried aromatics. Olives, capers, or artichokes if you have them. Fresh herbs — thyme, tarragon, basil — stirred in at the end rather than long-cooked into the broth. And often a handful of something bright at the finish: cherry tomatoes, fresh parsley, or a squeeze of orange.
The California cuisine context: Alice Waters at Chez Panisse in Berkeley is widely credited with establishing the foundations of California cuisine as a recognised cooking philosophy in the 1970s. The emphasis on seasonal, local produce over technique-heavy classical cooking has since spread into mainstream home cooking across the state. This recipe takes direct influence from that tradition — brightness, freshness, and restraint rather than richness for its own sake.
Why chicken thighs and not breasts
Chicken breasts are leaner and cook faster, which makes them well-suited for grilling, pan-searing, or poaching at higher temperatures for shorter times. They are not well-suited for braising. The extended moist heat that braising involves drives moisture out of lean breast meat, leaving it dry and fibrous by the time the exterior has any flavour development at all.
Thighs are different. They contain more fat and more connective tissue, both of which behave well under sustained low heat. The fat bastes the meat from the inside. The collagen in the connective tissue converts to gelatin, which gives the braising liquid body and contributes to the velvety texture of the finished sauce. At the end of 40 minutes at a gentle simmer, a bone-in thigh is tender, moist, and has absorbed the flavours of the braising liquid in a way that breast meat simply cannot.
Bone-in thighs are better than boneless for this recipe. The bone contributes to the flavour of the braising liquid and helps the meat stay moist because the fat around the joint continues basting throughout the cook. Boneless works fine — it’ll cook faster (reduce the braising time by about 10 minutes) but the sauce won’t be quite as rich.
Full recipe
Ingredients
| 6 bone-in, skin-on chicken thighs | 4 garlic cloves, thinly sliced | 2 large shallots, halved |
| Pat completely dry before seasoning. Moisture on the surface prevents proper browning. At room temperature for 20 minutes before cooking if you have time. | Sliced rather than minced — they mellow more slowly in the braising liquid and add a different character than minced garlic, which can go sharp or bitter if overcooked. | Softer and sweeter than onion. More California-kitchen than regular onion. If you only have white onion, use one medium, roughly diced. |
| 1 lemon — zested and juiced | ½ orange — zested and juiced | 240ml chicken stock |
| The citrus acidity does the work that wine usually does in a braise. Zest goes in early; juice is added at the end to keep the bright flavour intact. | Optional but excellent. Adds a rounder, sweeter citrus note that balances the sharper lemon. Blood orange in winter is exceptional here. | Good quality, low sodium. You control salt at the end. Homemade is ideal, but a decent store-bought works well. The stock and citrus together form the braising liquid. |
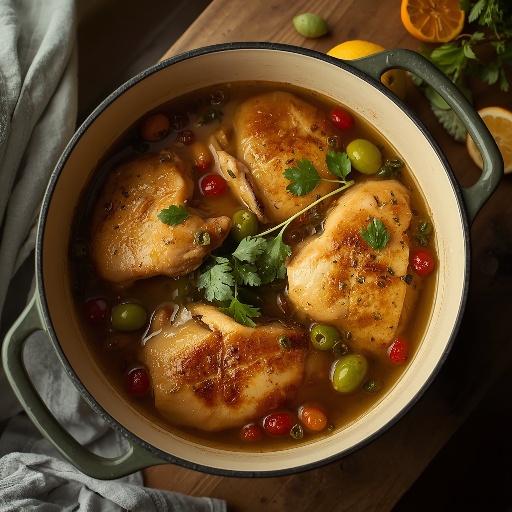
| 200g cherry tomatoes | ½ cup green olives, pitted and halved | 1 tbsp capers, rinsed |
| Added in the last 15 minutes — they soften into jammy bursts rather than dissolving into the sauce. California farmers’ market cherry tomatoes in summer are incomparable here. | Castelvetrano olives if you can find them — buttery, mild, and bright green. Regular green olives work. Kalamata is also good but shifts the flavour profile toward more intense briny territory. | The salt brine around capers adds a saline, slightly pickled note. Rinse before adding so they don’t over-salt the sauce. Optional — leave out if you or your guests dislike them. |
| 4 sprigs fresh thyme + 2 sprigs fresh tarragon | 2 tbsp good olive oil | Salt, black pepper, fresh flat-leaf parsley to finish |
| Thyme goes in early with the braising liquid. Tarragon is more delicate — add it in the last 5 minutes or stir in as a finishing herb off heat. It wilts quickly and loses its anise note with extended heat. | California extra-virgin olive oil is particularly appropriate here. Use it for the sear and as a finishing drizzle. The flavour comes through in a simple dish like this. | Season aggressively at every stage — the chicken before searing, the aromatics, and the final sauce. Finishing with fresh parsley is not optional decoration; it genuinely brightens the final dish. |
Method — stovetop, start to finish
- Season the chicken thighs generously with salt and pepper on both sides. Don’t be tentative — chicken braised in liquid needs to be seasoned before it goes in or the interior stays bland regardless of how well-seasoned the sauce is.
- Heat the olive oil in your dutch oven over medium-high heat until it shimmers. Add the chicken thighs skin-side down. Do not crowd the pan — if your dutch oven is small, sear in two batches. The thighs need contact with the hot surface to brown, and crowding causes steam which prevents browning entirely.
- Sear without moving for 6–7 minutes. The skin should release naturally when it’s ready — if it’s sticking, it needs more time. Flip and sear the flesh side for 3 minutes. The thighs won’t be cooked through at this point; they’re building colour and flavour. Remove and set aside on a plate.
- Reduce heat to medium. Add the shallots cut-side down and cook for 3 minutes until caramelised on the flat face. Add the sliced garlic and lemon zest and cook for 90 seconds — keep it moving to prevent the garlic from burning, which turns it bitter.
- Add the chicken stock and scrape the bottom of the pot with a wooden spoon to lift the browned bits. These are flavour — every bit of them should come up into the liquid. Add the orange juice and zest, thyme sprigs, and olives. Stir once to combine.
- Nestle the chicken thighs back into the pot skin-side up. The liquid should come about halfway up the sides of the thighs. Too much liquid and the skin steams instead of staying somewhat intact. Too little and the bottom scorches.
- Cover with the lid and reduce to the lowest simmer — medium-low on most burners. Cook for 20 minutes. Check at 10 minutes to confirm the liquid is barely simmering, not boiling. Adjust the flame if needed.
- Add the cherry tomatoes and capers. Re-cover and cook for another 12–15 minutes until the tomatoes have softened and slightly burst, and the chicken is completely cooked through (internal temperature of 74°C / 165°F at the thickest part, away from the bone).
- Remove from heat. Add the lemon juice, fresh tarragon, and a handful of roughly chopped flat-leaf parsley. Taste the sauce — adjust with salt, a little more lemon if it needs brightness, or a tiny pinch of sugar if the lemon is particularly sharp. Rest for 5 minutes before serving.
The sear — the step that changes everything
The Maillard reaction is what happens when meat is exposed to high, dry heat: proteins and sugars on the surface undergo a chemical transformation that produces hundreds of new flavour compounds. These compounds are complex, layered, and deeply savoury. They don’t form at braising temperatures — they need direct contact with a hot, dry surface.
Skipping the sear and going straight to braising produces chicken that’s perfectly safe to eat and technically cooked, but comparatively flat in flavour. The braising liquid never develops the same depth. It’s one of those steps that seems optional until you’ve tasted the difference.
| Dry the skin first | Don’t touch it | Temperature control |
| Kitchen paper, pressed firmly. Any moisture left on the surface steams before it sears. The pan should audibly sizzle the moment the chicken hits it. | Six to seven minutes undisturbed. The skin will stick initially and release when the crust has properly formed. If you force it up early, you lose the crust. | Medium-high, not high. High heat over a long sear causes the fond (browned bits) to go from golden to black. Black fond makes a bitter sauce. |
| Batch searing | Skin-side down first | Rest the seared pieces |
| One crowded pan defeats the purpose. Steam from too many pieces at once drops the pan temperature and prevents browning. Two relaxed batches is faster than one crowded one. | Always. The skin renders its fat, which bastes the flesh side when flipped, and the rendered fat improves the flavour of the aromatics that cook in it next. | Let them sit on a plate while you build the braising liquid. They’ll release some juices — pour those back into the pot when you add the chicken back in. |
Building the braising liquid without wine
Many classic chicken braise recipes rely on white wine for their acidity and complexity. Lemon and orange juice do the same structural job — they provide the acid that helps break down the connective tissue in the thighs and gives the sauce its brightness. The result is actually more distinctly California than wine-based versions.
If you prefer no citrus acidity
Replace the citrus juice with 2 tablespoons of apple cider vinegar added to the stock. Less distinctly California in flavour, but the structural role is the same. The sauce is slightly less bright and more neutral — better if you’re pairing with something very acidic on the side.
Adding white wine (if you have it)
Add 120ml of dry white wine to the shallots and garlic before the stock — let it reduce by half, then add the stock and citrus. This builds additional complexity. Sauvignon Blanc or Pinot Gris work particularly well. A California Chardonnay is the obvious regional choice, though its oak character can be slightly assertive in a light braise.
California produce to add by season
One of the defining features of cooking in California is that genuinely good produce is available year-round, just different produce depending on the month. This recipe adapts well to whatever’s at its best.
| Spring | Summer | Autumn |
| California peak | California peak | California peak |
| Artichoke hearts (canned or fresh-trimmed), spring onions instead of shallots, asparagus tips added in the last 8 minutes, peas stirred in at the finish. Meyer lemons are at their best in early spring. | Cherry tomatoes at full sweetness. Zucchini cut into chunks, added at the same time as tomatoes. Fresh basil instead of tarragon. Stone fruit — nectarine slices or apricot halves — as a bold choice that works surprisingly well with the olives and chicken. | Sun-dried tomatoes instead of fresh. Roasted red peppers stirred in. Fresh fennel, thinly sliced, cooked with the shallots. California figs, halved, added in the last 10 minutes. Pomegranate seeds scattered over the finished dish. |
| Winter | Year-round staples | Farmers’ market finds |
| California peak | Always available | Worth seeking |
| Blood oranges instead of regular. Cavolo nero (Tuscan kale) wilted in for the last 8 minutes. Preserved lemon rind, rinsed, for more complexity. Winter citrus — Cara Cara or navel oranges — at their absolute sweetest. | Castelvetrano olives, capers, garlic, shallots, lemons. These form the permanent backbone of the dish regardless of what seasonal produce is added around them. | Padron peppers (blistered separately and added at the end). Dragon tongue beans. Heirloom cherry tomatoes in multiple colours. Fresh turmeric grated into the braising liquid. Micro herbs for the finish. |
What to serve it with
The braising liquid is light and bright — citrus-forward rather than rich and meaty. That flavour profile calls for sides that soak it up without competing.
| Cooked white beans | Polenta | Crusty sourdough |
| Cannellini or butter beans, warmed and spooned alongside. They absorb the braising liquid like nothing else. A California-Italian pairing that feels completely natural. | Soft, just-cooked polenta with a little butter and parmesan. The sauce pools perfectly in it. One of the best pairings for any braise. | For the sauce. San Francisco sourdough is the obvious local choice — the tang of a well-fermented loaf pairs with the citrus braise in a way that regular bread doesn’t quite. |
| Basmati or jasmine rice | Roasted broccolini | Simple green salad |
| Simple, effective, practical. Spoon the chicken and sauce directly over the rice. Nothing wrong with the easy answer when it works this well. | Tossed in olive oil and roasted until the tips are crisp. Serves as both a vegetable side and a textural contrast to the soft, braised chicken. | Arugula with shaved parmesan, lemon dressing, and pine nuts. Dressed lightly and served alongside — the pepper of the arugula works with the bright citrus sauce. |
Common mistakes and fixes
The liquid is boiling instead of simmering
Boiling a braise toughens the meat. The proteins contract faster than the collagen dissolves, and the result is chewy rather than tender. The liquid should be barely moving — small bubbles breaking the surface occasionally, not a rolling boil. Reduce the flame and check again in five minutes.
The skin is pale and soft, not golden
The sear didn’t get hot enough, or the pan was crowded. In a stovetop braise, the skin won’t crisp during the covered cooking phase — whatever colour you got in the sear is what you’ve got. If you want crispier skin, uncover the pot for the last 5 minutes of cooking and increase the heat slightly to medium.
The sauce tastes flat or thin
Two likely causes. Either the fond wasn’t fully incorporated (go back and deglaze properly), or the sauce needs more acid. A squeeze of fresh lemon at the end will immediately sharpen a flat-tasting braising liquid. Also check salt — under-seasoned sauce always reads as “flat” even when the flavour profile is correct.
The tomatoes dissolved instead of holding their shape
Added too early. Cherry tomatoes only need 12–15 minutes — they should be added in the final phase, not at the same time as the chicken. If they’ve already gone into the sauce early and dissolved, don’t worry — the sauce will be richer for it. Just add a few fresh ones at the very end for texture.
The chicken is still pink near the bone
Re-cover and simmer for another 8–10 minutes. Bone-in thighs can take longer than expected, particularly large ones or if the liquid wasn’t fully simmering. The bone slows heat penetration. Always check with a thermometer rather than relying on timing alone — 74°C (165°F) at the thickest point, away from the bone.
A note on gas vs. induction stovetops: Gas burners give slightly more even heat around the base of a dutch oven than electric coil elements, which tend to have a hotter centre. On an electric coil or standard electric burner, consider rotating the pot every 15 minutes to compensate for any hot spots. Induction burners are actually very well suited to this — precise, responsive, and efficient at holding a steady simmer.
See Also – Soy-free teriyaki sauce recipe
See Also – Diabetic Friendly Potato Soup Recipe — Done Right