If you’ve ever roasted a ham and thrown away the bone, this is the article that might change that habit permanently.
A leftover ham bone is one of the most underused things in a home kitchen. It looks like scraps. It is, in every meaningful sense, the beginning of a seriously good soup — one that takes very little active work, costs almost nothing extra, and produces something that tastes like it simmered all day. Which, in a slow cooker, it does.
This is a complete guide: what you need, how to build the soup, what makes it genuinely good versus just serviceable, and how to handle the variations that come up in real cooking.
Why the Slow Cooker Is the Right Tool for This
A ham bone soup can be made on the stovetop. It can be made in a pressure cooker. But the slow cooker is the best fit, and not just because it’s hands-off.
The long, low heat of a slow cooker extracts collagen from the bone gradually, converting it to gelatin over hours. That gelatin is what gives the finished soup its body — that slightly thick, coating quality that makes a bowl feel substantial rather than watery. High heat does this faster but more aggressively; the broth can turn cloudy and the flavors can become muddy.
Low and slow produces a clearer, rounder broth. The vegetables hold their shape better. The beans — if you’re using them — stay intact rather than disintegrating. And you don’t have to be in the kitchen while it happens.
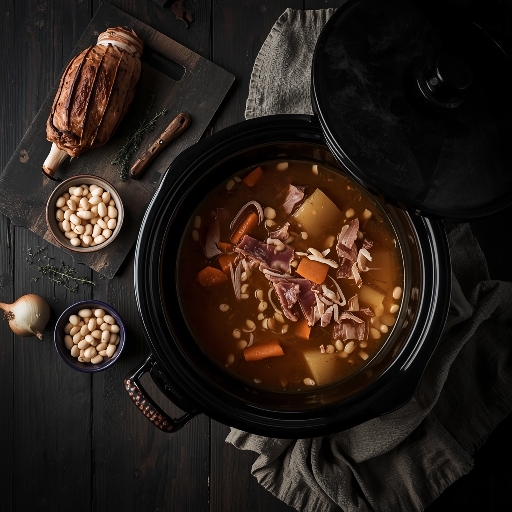
The other practical point: ham bones are large and awkward. A slow cooker accommodates them better than most pots, especially the six-quart size that fits a full-sized ham bone with room for everything else.
What You Need
The Ham Bone
This is the obvious starting point. A bone from a glazed holiday ham, a smoked half-ham, or even a ham hock from the butcher all work. The more meat left on the bone, the more the soup benefits — but even a well-picked bone with very little remaining meat will still produce excellent broth after eight hours of slow cooking.
If you’ve stored the bone in the freezer after a previous meal, that’s fine. Use it straight from frozen — add an hour to the cooking time and make sure the slow cooker has enough liquid to accommodate it from the start.
The Beans
Dried beans are better than canned for this application, mostly because they absorb the ham broth as they cook and become seasoned throughout rather than just coated on the outside. Navy beans are the traditional choice — small, creamy, and they partially break down into the broth naturally, thickening it without any intervention.
Great Northern beans work similarly. Split peas (yellow or green) are another option and produce a thicker, more porridge-like soup that’s particularly good in cold weather. Lentils cook faster and don’t need soaking, but they dissolve almost completely and change the texture of the soup considerably.
If using dried beans: soak overnight in cold water, then drain before adding to the slow cooker. This reduces cooking time and produces a more consistent texture. If you forget to soak, add an extra hour to the cook time.
Canned beans can be used — add them in the last hour only, or they’ll become mushy.
The Vegetables
The base is simple: onion, carrot, and celery. This is the standard aromatic trio — the same foundation used in nearly every Western braised or slow-cooked dish for good reason. Each one contributes a different layer of flavor that, together, form the backdrop for everything else.
Cut them large. Small dice will dissolve over eight hours. Rough chunks hold shape and give the soup something to show when you serve it.
Beyond the base, the most common additions are:
- Garlic — several cloves, smashed rather than minced, so they release slowly
- Diced potato — adds body and absorbs the smoky ham flavor beautifully; add in the last two hours only
- Chopped kale or spinach — added in the final thirty minutes so it wilts but doesn’t turn to mush
- Diced tomatoes — a tin of crushed or diced tomato adds acidity that cuts through the richness
The Liquid
Water works. But a combination of water and chicken stock produces noticeably better results — the stock adds a background savory depth that pure water lacks.
Use four to five cups of liquid total for a six-quart slow cooker with a full ham bone. The bone and beans will release their own moisture as they cook, and the soup will reduce slightly over the long cooking time. Start with enough to comfortably cover everything and check at the halfway mark.
Seasonings
Go easy at the start. Ham bones vary enormously in saltiness depending on how the original ham was cured, and a heavily smoked, well-salted bone will season the entire pot without any additional salt needed. Add a bay leaf or two, a few black peppercorns, dried thyme, and if you have it, a small amount of smoked paprika.
Taste and adjust salt only in the last hour of cooking, after the bone has had time to season the broth.
The Full Slow Cooker Recipe
Ingredients (Serves 6–8)
- 1 leftover ham bone (with whatever meat remains)
- 1 lb (450g) dried navy beans or Great Northern beans, soaked overnight and drained
- 1 large onion, roughly chopped
- 3 medium carrots, cut into 1-inch pieces
- 3 stalks celery, cut into 1-inch pieces
- 4 cloves garlic, smashed
- 2 medium potatoes, peeled and cut into 1-inch chunks (add later)
- 2 bay leaves
- 1 tsp dried thyme
- ½ tsp smoked paprika
- ½ tsp black pepper
- 4 cups chicken stock
- 2 cups water
- 2 cups chopped kale or spinach (add in final 30 minutes)
- Salt to taste at the end
Instructions
Step 1: Load the slow cooker. Place the ham bone in the center of the slow cooker. Add the soaked, drained beans around and under it. Add the onion, carrot, celery, and garlic. Pour in the chicken stock and water. Add the bay leaves, thyme, smoked paprika, and black pepper. The liquid should come to just below the top of the ingredients — not fully submerging the bone is fine.
Step 2: Cook on low for 8–10 hours (or high for 5–6 hours). Low is strongly preferred. The broth develops more complexity and the beans hold their shape better. High heat works if time is short, but the result is slightly less nuanced.
Step 3: At the 6–7 hour mark (low) or 4-hour mark (high). Add the diced potato. Push it down into the broth. Replace the lid and continue cooking.
Step 4: At the 30-minute mark before serving. Remove the ham bone carefully — it will be very tender and the meat will fall off easily. Set it on a cutting board and let it cool for five minutes. Pull all remaining meat from the bone, discard the bone, cartilage, and any fatty pieces. Shred or chop the meat and return it to the soup.
Add the kale or spinach. Replace the lid for the final thirty minutes.
Step 5: Taste and adjust. Remove the bay leaves. Taste the broth — this is when you decide whether it needs salt. If the ham bone was heavily cured and smoked, it probably doesn’t. If it’s mild, add salt carefully in small amounts and taste between additions.
Step 6: Serve. Ladle into deep bowls. Good bread alongside is not optional.
Making It Your Own: Variations That Actually Work
Ham and Split Pea Soup
Replace the beans with one pound of dried split peas (no soaking required). Cook on low for eight hours. The split peas dissolve into the broth and produce a thick, deeply savory, almost porridge-like soup. This is the most classic version of ham bone soup in American and British cooking.
Some people blend it partially for a smoother consistency — an immersion blender directly in the pot for thirty seconds leaves some texture while smoothing most of the peas into the broth.
Season generously with white pepper. Split pea soup benefits from more pepper than you’d think.
Ham Bone Minestrone
Add a tin of diced tomatoes, a handful of dried small pasta (ditalini or elbow macaroni), zucchini cut into small cubes, and a tin of cannellini beans alongside the navy beans. Add the pasta in the final hour only, or it will absorb all the liquid and turn to paste.
Finish with grated Parmesan and fresh parsley. This is a fuller, more Italian-leaning version that works well when you want something heartier and more vegetable-forward.
Ham and Potato Soup (Thicker Version)
Use more potato — three or four medium potatoes instead of two. Cook until completely tender, then use a potato masher or immersion blender to mash roughly a third of the potato directly in the pot. This thickens the broth significantly without any added flour or cornstarch.
Add a splash of heavy cream in the last thirty minutes if you want something richer. Top with shredded cheddar and sour cream when serving.
Ham Bone Bean Soup with Greens (Southern Style)
Skip the potato and add a full bunch of collard greens, stems removed and leaves torn into large pieces, in the final two hours of cooking. Add a splash of apple cider vinegar at the end — about a tablespoon — which brightens the flavor of both the greens and the broth.
This version is simpler than the others and relies entirely on the ham bone, beans, and greens for its character. It’s the oldest version of this soup in American Southern cooking, and it’s excellent.
What to Do If Something Goes Wrong
The Soup Is Too Salty
This happens when the ham bone was heavily cured. A few fixes:
- Add more water and an additional can of drained beans to dilute the salt and absorb some of it.
- Add diced potato and continue cooking — potato absorbs salt as it cooks and the starch softens the saltiness somewhat.
- A small amount of sugar (half a teaspoon) can balance saltiness without making the soup taste sweet.
Don’t add unsalted broth if you’re out of it — plain water is actually better for dilution because it doesn’t add any competing flavor.
The Beans Are Still Hard
This usually means they weren’t soaked long enough, or the slow cooker didn’t reach adequate temperature. If the beans are still firm after the full cooking time, switch to high for an additional hour with the lid on, or transfer to a pot on the stove and simmer hard for thirty minutes.
Acidic ingredients — tomatoes, vinegar — can prevent beans from softening. If you added tomatoes early in the recipe, that may be the cause. Add them later next time.
The Soup Is Too Thin
Mash some of the beans against the side of the pot. Even a few spoonfuls of mashed bean stirred back into the broth thickens it noticeably. Alternatively, remove a cup of the soup, blend it smooth, and stir it back in — this is the easiest thickening method and doesn’t require any added starch.
A longer cook with the lid slightly ajar in the final hour also reduces the liquid and concentrates the flavor.
The Broth Tastes Flat
If the finished soup tastes one-dimensional, it usually needs acid rather than salt. A tablespoon of apple cider vinegar or a squeeze of lemon juice stirred in just before serving lifts the flavor significantly. Fresh herbs — parsley, thyme — added right at the end also help.
Storage, Reheating, and Freezing
Leftover ham bone soup keeps in the refrigerator for four to five days. It will thicken considerably as it cools — the gelatin from the bone sets the broth slightly. This is normal and actually a sign of a well-made soup; thin it with a splash of water or stock when reheating.
To reheat: a covered pot over medium-low heat with a small amount of added liquid, stirring occasionally, takes about ten minutes from refrigerator temperature. Microwave reheating works fine for individual portions — medium power, covered, in two-minute intervals with stirring between.
For freezing: cool completely, then portion into containers or zip-lock bags. Freeze for up to three months. Soups with potato freeze less cleanly — the potato can become grainy when thawed. If you plan to freeze the soup, consider leaving the potato out entirely and adding it fresh when reheating.
Tips That Make a Real Difference
Brown the vegetables first if you have time. This is optional but worthwhile. Five minutes of the onion, carrot, and celery in a hot pan with a little oil before adding them to the slow cooker develops caramelized flavor compounds that don’t develop in a low-heat, wet environment. The difference is subtle but noticeable.
Don’t lift the lid during cooking. Each time the lid is removed, the slow cooker loses significant heat and needs twenty to thirty minutes to recover. Unless you’re adding potatoes or greens at the designated time, leave it alone.
A Parmesan rind in the broth. If you keep Parmesan rinds in the freezer (which is worth doing), add one to the pot at the beginning of cooking. It dissolves slowly and adds a savory, slightly funky depth to the broth that’s difficult to achieve any other way.
Acid at the finish. A splash of apple cider vinegar, a squeeze of lemon, or even a small amount of white wine vinegar stirred in right before serving brightens the entire bowl. Ham-based soups in particular benefit from a touch of acid to balance the richness.
Taste the ham before adding salt. Before you season the broth at all, pull a piece of meat from the bone after cooking and taste it. If it’s very salty, the broth will be too. Work from there.
Serving Suggestions
Ham bone soup is a complete meal in a bowl. It doesn’t need much alongside it.
Bread is the obvious companion — a crusty white loaf, cornbread, or even simple dinner rolls. The bread’s purpose is practical: it soaks up the broth at the bottom of the bowl, which is the best part.
A sharp green salad alongside balances the richness of the soup — something with a vinegary dressing rather than a creamy one.
Grated Parmesan or sharp cheddar stirred into the bowl at the table adds richness and a bit of salt.
Hot sauce on the side is particularly good with the Southern-style version with collard greens.
Final Thoughts
A ham bone soup in the slow cooker is one of those meals that rewards patience more than effort. The hands-on time is less than thirty minutes total — the rest is the slow cooker doing exactly what it’s designed to do.
The result is a deeply flavored, filling soup that costs almost nothing when the bone is a byproduct of another meal. It keeps well, freezes well, and tastes better the next day after the flavors have had overnight to settle.
If there’s one thing worth taking from this guide: don’t skip the step of tasting and adjusting at the end. The ham bone does most of the seasoning work, but a final taste with a small adjustment — a pinch of salt, a splash of vinegar, a handful of fresh herbs — is what takes the soup from good to something you’d actually want to make again.
See Also – Substitute for Dry Mustard in a Recipe: What to Use and How Much
See Also – Substitute for Cream of Tartar in Cookies: Every Option Explained